Build With Scons

SCons is touted as an easier, more reliable and faster way to build software with in-built support for multiple languages and an easily extensible user-defined builder system.
Program('app.c')
Build Tools
Let’s talk briefly about build tools so as to understand the role SCons plays in the build process.
Build tools are described as programs that automate the creation of executable applications from source files.
We should keep in mind that the build process incorporates the processes of compiling,linking, and packaging source code into an executable.
Build tools help ease this process by tracking the following processes and items: build requirements, build sequence, and project depencencies hence making the build process consistent.
Currently build tools are split into:
- Build automation utilities
- such as CMake, Ant, sbt
- Build automation servers
- which are essentially web-based and run builds on trigger or schedule basis. Example TravisCI
The above can be further subdivided into other broader sub-categories.
Build process
Next, let’s take a brief look at a typical build process. In this case we’ll look at a simple C program build process.
The application source code is as below:
| #include <stdio.h> | |
| #define UNIVERSAL_CONSTANT 42 | |
| /** | |
| * app.c is currently the world's most complex application. | |
| * We'll never know, will we? | |
| */ | |
| int main(int argc, char const *argv[]) | |
| { | |
| // The answer to life's most fundamental question: | |
| printf("Well the answer is %i", UNIVERSAL_CONSTANT); | |
| return 0; | |
| } |
Pre-processing
In this initial stage the pre-processor joins continued lines and removes comments. Preprocessor commands such as
#include <stdio.h>
are interpreted to form a macro language. Symbolic constant are then evaluated to their defined values example
#define UNIVERSAL_CONSTANT 42
Let’s inspect the result of this process by executing the following command
gcc -E <filename.c> -o <filename.i>
For such a simple program, you’ll notice a very massive expanded file.
However, of interest, you should notice the following section in the intermediate .i expanded source code file.
int main(int argc, char const *argv[])
{

    printf("Well the answer is %i", 42);
    return 0;
}
You’ll notice that our macro UNIVERSAL_CONSTANT has been substituted with 42 and all comments in the code have been stripped off.
Compiling
In this this stage, the expanded source code file is taken as input and translated into assembly instructions for the target processor architecture by the compiler .
Let’s see this in action by running the following command
gcc -S <filename.c> -o <filename.s>
In our example application the output will be as shown :
| .file "app.c" | |
| .text | |
| .section .rodata | |
| .LC0: | |
| .string "Well the answer is %i" | |
| .text | |
| .globl main | |
| .type main, @function | |
| main: | |
| .LFB0: | |
| .cfi_startproc | |
| pushq %rbp | |
| .cfi_def_cfa_offset 16 | |
| .cfi_offset 6, -16 | |
| movq %rsp, %rbp | |
| .cfi_def_cfa_register 6 | |
| subq $16, %rsp | |
| movl %edi, -4(%rbp) | |
| movq %rsi, -16(%rbp) | |
| movl $42, %esi | |
| leaq .LC0(%rip), %rdi | |
| movl $0, %eax | |
| call printf@PLT | |
| movl $0, %eax | |
| leave | |
| .cfi_def_cfa 7, 8 | |
| ret | |
| .cfi_endproc | |
| .LFE0: | |
| .size main, .-main | |
| .ident "GCC: (GNU) 8.3.0" | |
| .section .note.GNU-stack,"",@progbits |
Assembling
In this stage the assembler takes the intermediate assembly code as input and translates it into an object file that can be run by the target processor in a format known as relocatable object program .
Note that most of the functions will not be resolved and will only be resolved at a later stage.
Let’s have a look at this stage by running the following commands:
gcc <filename.c> -c <filename.o>
The output will be as shown (using hedxump utility in GNU/Linux Ubuntu)
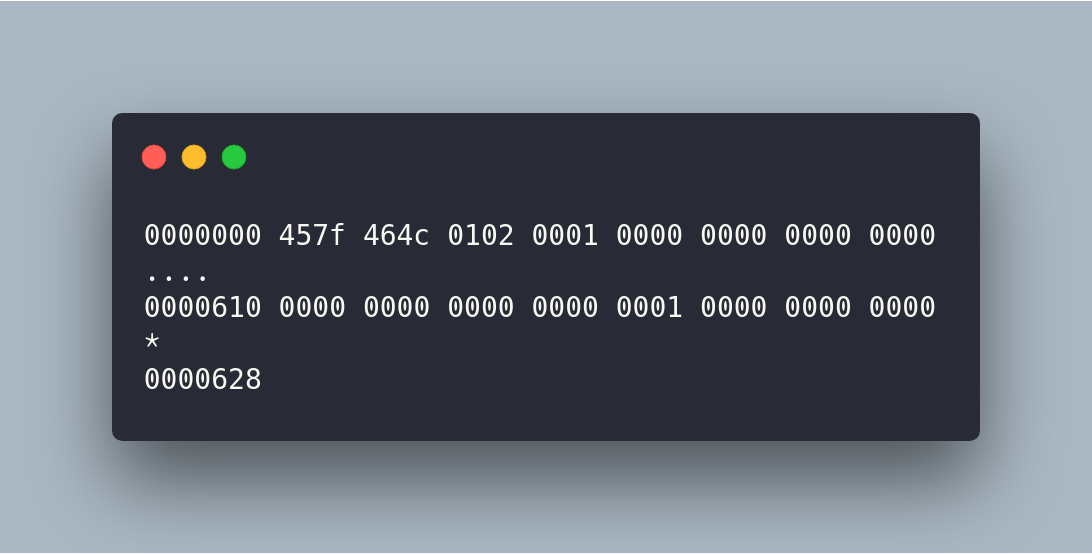
When we try to read the file contents via cat we get the following output
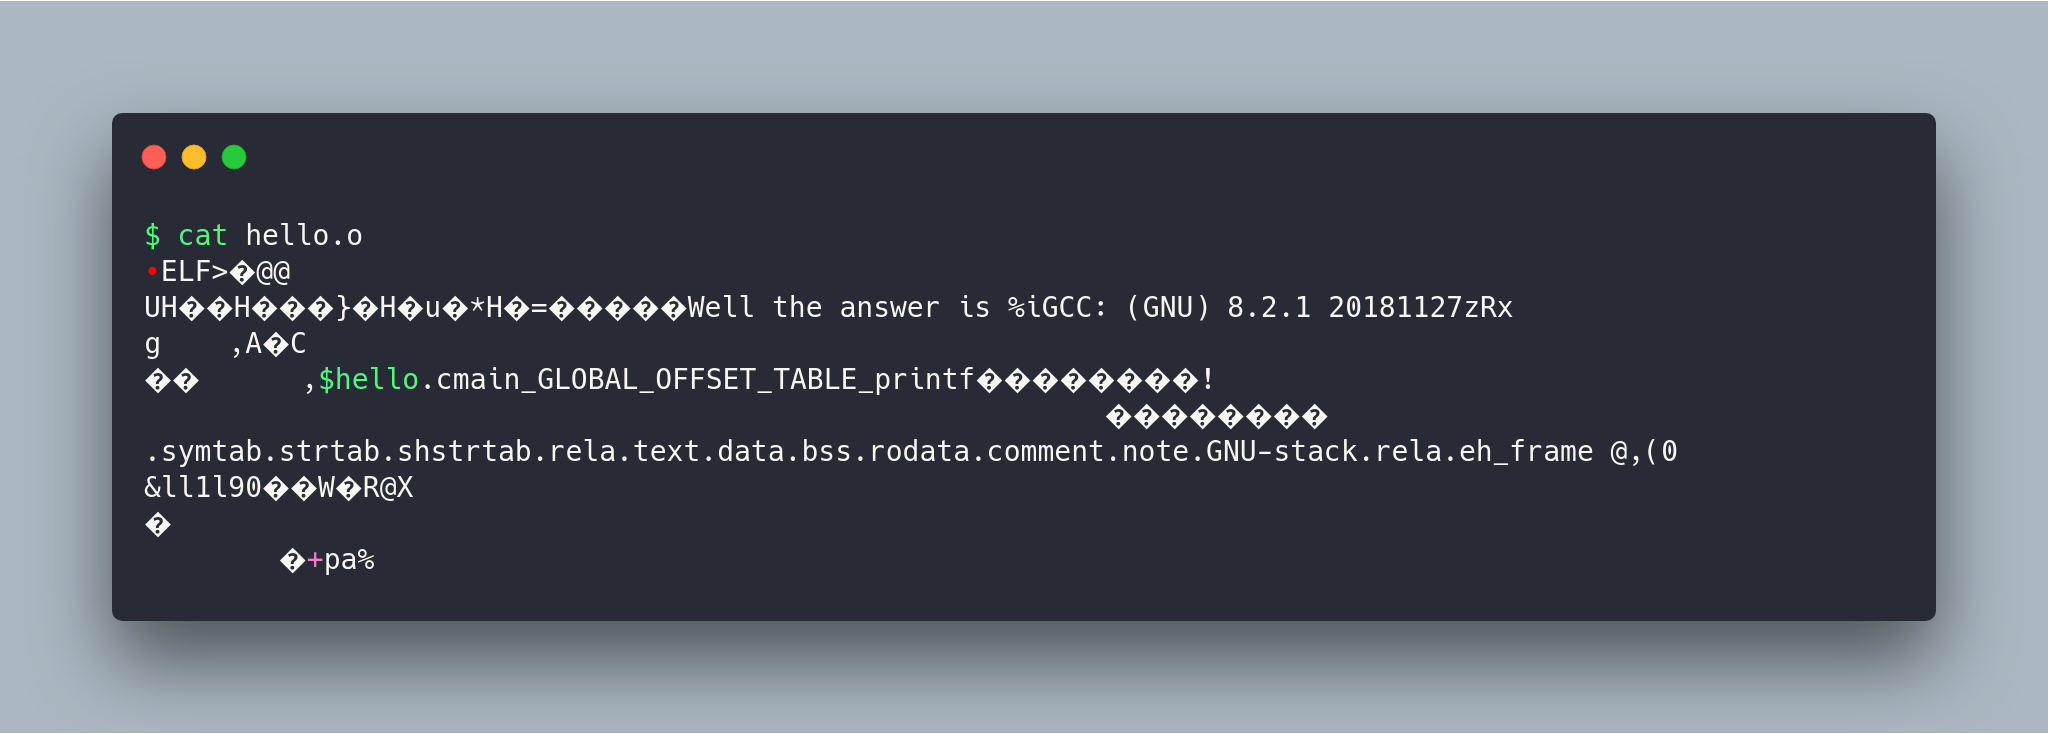
From the above output, not much can be derived other than our expected output Well the answer is %i.
Linking
In this stage, the object code will be re-arranged by the linker to facilitate function calls. The linker will also resolve various function calls from libraries and plug(merge) them into the program.
The linker will handle instructions for setting up the running environment like parsing command line arguments, environment variables and return values. The object code is finally converted into an executable by the linker.
Let’s inpect this process by running the following command
gcc <filename.c>
You should now get an executable a.out file, which you can run by executing the following command
./a.out
Why this is important
-
Understanding of machine-level code and compiler translation processes enables one to make good decisions on how to write efficient code.
-
In building large applications, understanding the linker process can be of great use in solving some of the most complex link-time errors.
-
Understanding how data is read and in which format helps in avoiding gaping security holes commonly present in most applications.
Tips
You could have generated all intermediate files by running
gcc -save-temps <filename.c>
You can also name the final artifact by passing the -o flag to gcc
gcc -o <executablename> <filename.c>
Summary
The above processes can be visualized as below
SCons
Now that we have an idea of the build process, lets dive into SCons
Installation
Build from source
As of the time of writing this article the latest version is 3.0.1
The procedure is pretty simple : Create a directory to install SCons and download the latest version and install
sudo mkdir -p /opt/src   &&\
cd /opt/src/ &&\
sudo wget http://prdownloads.sourceforge.net/scons/scons-3.0.1.tar.gz &&\
sudo tar -xvzf scons-3.0.1.tar.gz &&\
cd scons-3.0.1/ &&\
sudo python setup.py install
Using a package manager
Debian apt
sudo apt-get install scons -y
Arch Pacman
sudo pacman -S scons
Usage
SCons will search for a SConstruct or Sconstruct or sconstruct file to fetch build configurations.
Because SConstruct files are treated as normal Python files, one can leverage Python’s scripting capabilities to handle complex build processes.
Basic
Let’s start by developing a simple application that generates fractal images in PPM format.
The application structure is a shown as below:
.
|-- SConstruct
|-- lib
|   |-- mandelbrot.cc
|   `-- mandelbrot.hpp
`-- src
    `-- app.cc
We’ll begin with a barebones SConstruct configuration.
Library('mandelbrot',['./lib/mandelbrot.cc'])
Program('./src/app.cc', LIBS=['mandelbrot'], LIBPATH='.')
In this instance we’re instructing SCons to build a mandelbrot library and also passing the library source files lib/mandelbrot.cc. Then we build our application whose source files are located inside src/app.c by linking it to our library.
Then inside the project directory we run SCons
scons
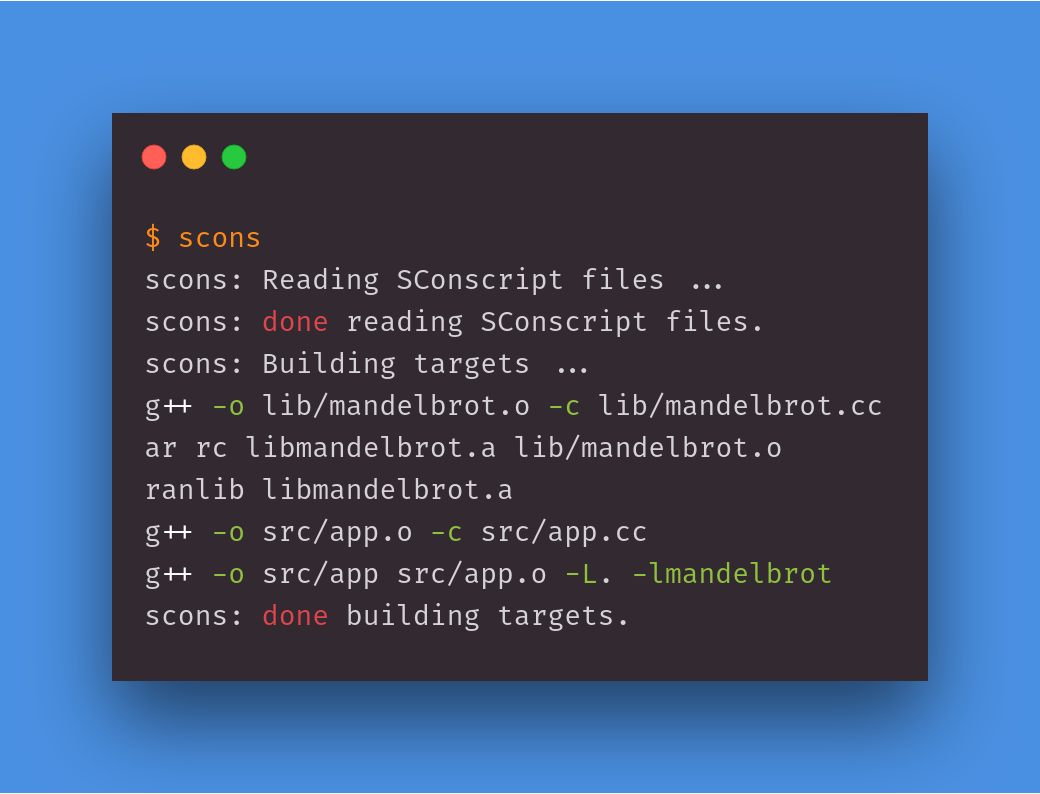
Inside your project directory you should now have a tree similar to this
|-- SConstruct
|-- lib
|   |-- mandelbrot.cc
|   |-- mandelbrot.hpp
|   `-- mandelbrot.o
|-- libmandelbrot.a
`-- src
    |-- app
    |-- app.cc
    `-- app.o
You’ll notice that we now have an executable app inside our src/ directory which can be launched from the commandline by executing ./src/app .
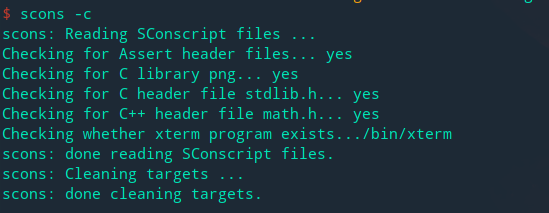
Now let’s clean up the the output and try something different. Run the following command:
scons -c
Custom output directory
In this configuration we’ll define the output directory for our executable: in this case the output will be inside the dist directory.
Library('mandelbrot',['./lib/mandelbrot.cc'])
Program('dist/mandelbrot','./src/app.cc', LIBS=['mandelbrot'], LIBPATH='.')
Running the scons command results in to the creation of an executable inside the dist folder.
.
|-- SConstruct
|-- dist
|   `-- mandelbrot
|-- lib
|   |-- mandelbrot.cc
|   |-- mandelbrot.hpp
|   `-- mandelbrot.o
|-- libmandelbrot.a
`-- src
    |-- app.cc
    `-- app.o
Now we can clean the result by running the scons -c command.
Custom clean command
But you’ll notice that the dist folder will remain after the clean command is run. We can add a custom Clean() method that will remove specified folders and directories. The Clean() expects :
- Target as the first argument which is the return value of the command which creates the file
- File/Directory which is the file or directory you want removed
Now, the SConstruct will look like this
Library('mandelbrot',['./lib/mandelbrot.cc'])
Program('dist/mandelbrot','./src/app.cc', LIBS=['mandelbrot'], LIBPATH='.')
target = Program('dist/mandelbrot','./src/app.cc', LIBS=['mandelbrot'], LIBPATH='.')
Clean(target,'./dist')
This can be useful if the build command generates log files or certain artifacts that you might later want to discard.
Adding build time help option
Suppose now you’d like to allow your users to supply custom build options.
Library('mandelbrot',['./lib/mandelbrot.cc'])
Help("""
Usage: 'scons .' to build the mandelbrot application
       'scons -Q IMAGETYPE=PNG' to generate PNG output only, default is PPM
       'scons -Q IMAGETYPE=ALL' to generate both PPM and PNG images
""")
import platform
platform_ = platform.system()
if platform_ == 'Linux':
    Help("\nType:  'scons linux' Build with native Linux support.\n")

if platform_ == 'Windows':
    Help("\nType:  'scons win32' Build with native Windows support.\n")

vars = Variables(None)
vars.Add(EnumVariable('IMAGETYPE', 'Set to PNG to build for PNG image output support  or ALL to generate PNG and PPM', 'PPM' ,
        allowed_values=('PNG','PPM','ALL')))
env = Environment(variables = vars,
                  CPPDEFINES={'IMAGETYPE' : '"${IMAGETYPE}"'})
unknown = vars.UnknownVariables()
if unknown:
    print("Unknown variables: %s"%unknown.keys())
    Exit(1)
env.Program('dist/mandelbrot','./src/app.cc', LIBS=['mandelbrot'], LIBPATH='.')
target = env.Program('dist/mandelbrot','./src/app.cc', LIBS=['mandelbrot'], LIBPATH='.')
Clean(target,'./dist')
In the above instance you can see we practically invoked Python to read OS Information. This can be useful if you want to call native platform build or disable builds for certain platforms.
We’re also letting the user know that they can pass scons -Q IMAGETYPE=PNG to build the app with PNG support. Also note that IMAGETYPE is set to PPM by default. See the EnumVariable() function.

Now when a user types scons -h from the project directory they should see the following (GNU/Linux example):
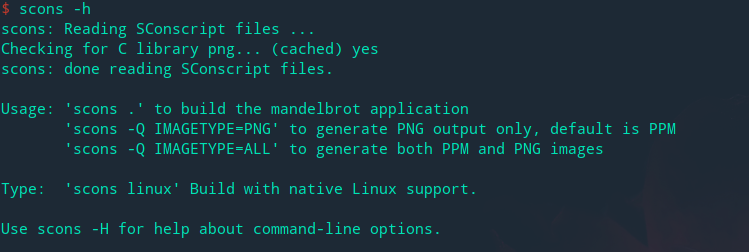
Now, we have a
MACROin our sample application that will generate a PNG image whenIMAGETYPE=PNGis passed in the compilation flags.
Checking for libraries and header files
SCons offers a provision to check for the existence specific header files in the the system, as well as programs, functions and datatypes.
This is facilitated by the Configure(arg) function :
conf = Configure(env)
Check for header files
if not conf.CheckCHeader('stdlib.h'):
    print 'C standard library not found!'
    Exit(1)
For C++ the above check can be modified as follows conf.CheckCXXHeader('header.h')
if not conf.CheckCXXHeader('math.h'):
    print 'Math.h must be installed!'
    Exit(1)
Check for a library
{% codeblock SContruct lang:python %} if not conf.CheckLib(‘png’): print ‘PNG Library not found’ Exit(1)
### Check for an application
```py
if not conf.CheckProg('xterm'):
  print 'XTerm must be installed'
  Exit(1)
Write custom checks
One can also write custom checks. Suppose we’d like to check for assert.h without relying on SCons' inbuilt checks:
test_assert = """
#include <assert.h>
int test_assert(int x)
{
    assert(x <= 4);
    return x;
}
int main()
{
    test_assert(2);
    return 0;
}
"""

def CheckForAssert(context):
    context.Message('Checking for Assert.h ... ')
    result = context.TryLink(test_assert, '.c')
    context.Result(result)
    return result

conf = Configure(env, custom_tests = {'CheckForAssert' : CheckForAssert})

if not conf.CheckForAssert():
    print 'Could not find assert.h !'
    Exit(1)
Note that the TryLink(arg1, arg2) generates an arg2 filetype - eg. .c - to run the check.
You’ll notice that a.sconf_temp directory is created during these tests and in one of the files the following lines can be found
#include <assert.h>

int test_assert(int x)
{
    assert(x <= 4);
    return x;
}

int main()
{
    test_assert(2);
    return 0;
}
When run, the resulting output is like shown below
Configuration
The complete SConstruct file for this blog is as given below; change to suite your application build requirements
| #Barebones configuration | |
| #Library('mandelbrot',['./lib/mandelbrot.cc']) | |
| #Program('./src/app.cc', LIBS=['mandelbrot'], LIBPATH='.') | |
| #Customize excecutable directory and add a Clean up function | |
| #Library('mandelbrot',['./lib/mandelbrot.cc']) | |
| #Program('dist/mandelbrot','./src/app.cc', LIBS=['mandelbrot'], LIBPATH='.') | |
| #target = Program('dist/mandelbrot','./src/app.cc', LIBS=['mandelbrot'], LIBPATH='.') | |
| #Clean(target,'./dist') | |
| #Add build help | |
| #Library('mandelbrot',['./lib/mandelbrot.cc']) | |
| #Program('dist/mandelbrot','./src/app.cc', LIBS=['mandelbrot'], LIBPATH='.') | |
| #target = Program('dist/mandelbrot','./src/app.cc', LIBS=['mandelbrot'], LIBPATH='.') | |
| #Clean(target,'./dist') | |
| #Help(""" | |
| #Usage: 'scons .' to build the mandelbrot application | |
| # 'scons PNGSUPPORT' to add PNG support to the application | |
| #""") | |
| #import platform | |
| #platform_ = platform.system() | |
| #if platform_ == 'Linux': | |
| # Help("\nType: 'scons linux' Build with native Linux support.\n") | |
| #if platform_ == 'Windows': | |
| # Help("\nType: 'scons win32' Build with native Windows support.\n") | |
| # Add Custom Commandline targets | |
| Help(""" | |
| Usage: 'scons .' to build the mandelbrot application | |
| 'scons -Q IMAGETYPE=PNG' to generate PNG output only, default is PPM | |
| 'scons -Q IMAGETYPE=ALL' to generate both PPM and PNG images | |
| """) | |
| import platform | |
| platform_ = platform.system() | |
| if platform_ == 'Linux': | |
| Help("\nType: 'scons linux' Build with native Linux support.\n") | |
| if platform_ == 'Windows': | |
| Help("\nType: 'scons win32' Build with native Windows support.\n") | |
| vars = Variables(None) | |
| vars.Add(EnumVariable('IMAGETYPE', 'Set to PNG to build for PNG image output support or ALL to generate PNG and PPM', 'PPM' , | |
| allowed_values=('PNG','PPM','ALL'))) | |
| env = Environment(variables = vars, | |
| CPPDEFINES={'IMAGETYPE' : '"${IMAGETYPE}"'}) | |
| # CCFLAGS='`-I/usr/include/ImageMagick-7 -fopenmp -DMAGICKCORE_HDRI_ENABLE=1 -DMAGICKCORE_QUANTUM_DEPTH=16 -I/usr/include/ImageMagick-7 -fopenmp -DMAGICKCORE_HDRI_ENABLE=1 -DMAGICKCORE_QUANTUM_DEPTH=16 -lMagick++-7.Q16HDRI -lMagickWand-7.Q16HDRI -lMagickCore-7.Q16HDRI -lMagick++-7.Q16HDRI -lMagickWand-7.Q16HDRI -lMagickCore-7.Q16HDRI') | |
| unknown = vars.UnknownVariables() | |
| if unknown: | |
| print("Unknown variables: %s"%unknown.keys()) | |
| Exit(1) | |
| env.Append(CPPPATH = ['/usr/include', '/usr/local/include']) | |
| # Check if we have some headers | |
| test_assert_source_file = """ | |
| #include <assert.h> | |
| int test_assert(int x) | |
| { | |
| assert(x <= 4); | |
| return x; | |
| } | |
| int main() | |
| { | |
| test_assert(2); | |
| return 0; | |
| } | |
| """ | |
| def CheckForAssert(context): | |
| context.Message('Checking for Assert header files... ') | |
| result = context.TryLink(test_assert_source_file, '.c') | |
| context.Result(result) | |
| return result | |
| conf = Configure(env, custom_tests = {'CheckForAssert' : CheckForAssert}) | |
| if not conf.CheckForAssert(): | |
| print 'Assert header files not found!' | |
| Exit(1) | |
| if not conf.CheckLib('png'): | |
| print 'PNG Library not found' | |
| Exit(1) | |
| if not conf.CheckCHeader('stdlib.h'): | |
| print 'CMath.h must be installed!' | |
| Exit(1) | |
| if not conf.CheckCXXHeader('math.h'): | |
| print 'Math.h must be installed!' | |
| Exit(1) | |
| if not conf.CheckProg('xterm'): | |
| print 'XTerm must be installed' | |
| Exit(1) | |
| env = conf.Finish() | |
| # Build | |
| Library('pngwriter',['./include/pngwriter/src/pngwriter.cc', './include/pngwriter/src/pngwriter.h']) | |
| Library('mandelbrot',['./lib/mandelbrot.cc']) | |
| env.Program('dist/mandelbrot','./src/app.cc', LIBS=['png', 'pngwriter', 'mandelbrot'], LIBPATH=['.']) | |
| target = env.Program('dist/mandelbrot','./src/app.cc', LIBS=[ 'png', 'pngwriter', 'mandelbrot'], LIBPATH=['.']) | |
| Clean(target,'./dist') |
Katacoda
Get up and runing with SCons without installing it in your PC. Follow through with this Katacoda scenario to get started.
Materials
Happy Building! :)